In what ways does your media product use, develop or
challenge forms and conventions of real media products?


 In nearly all music videos it is
necessary for several close up shots of the lead singer, especially if there is
a performance aspect to the video. This gives the lead singer authority and
makes them the focal point of the video for the viewer. In The Kaiser chiefs
‘I Predict a Riot’ and Kings of Leon’s ‘Sex on Fire’ there are clear
examples of this. Therefore we made sure that our final piece had close up
shots of our lead singers (Becky) face throughout the video. We also thought
that we could add our own aspect to this and often included fading the features
of her face as we started or ended the shot. A good example of this can be seen
at the end of the video as the music dies out her features become less clear.
You can see in the two examples that it is important that the singers face is
in the center of the shot, which again is something that we incorporated into
our product.
In nearly all music videos it is
necessary for several close up shots of the lead singer, especially if there is
a performance aspect to the video. This gives the lead singer authority and
makes them the focal point of the video for the viewer. In The Kaiser chiefs
‘I Predict a Riot’ and Kings of Leon’s ‘Sex on Fire’ there are clear
examples of this. Therefore we made sure that our final piece had close up
shots of our lead singers (Becky) face throughout the video. We also thought
that we could add our own aspect to this and often included fading the features
of her face as we started or ended the shot. A good example of this can be seen
at the end of the video as the music dies out her features become less clear.
You can see in the two examples that it is important that the singers face is
in the center of the shot, which again is something that we incorporated into
our product.
By using a mix of performance and
narrative we challenged the conventions of many indie rock videos as the
majority use one or the other. Kings of Leon shoot their entire film in
the same venue which is a complete contrast to the wide variety of locations
that we have used. Similar to Miles Kane in his video for ‘Come
Closer’, however Kane is present in most of the shots whereas we only have
the band members performing in the performance parts. Our Narrative section can
be much more closely linked with that of Arcade Fire's 'The Suburbs'. We
found many of our ideas from watching this video, although it is entirely
narrative it has a theme of (young life) similar to that of the song we had
chosen.


 We saw that videos such as ‘The
suburbs’ and ‘I predict a riot’ had shots of groups of people enjoying
themselves in ways such as a pillow fight or BB gun fight. Therefore we decided
to include the color powder scene. Color powder is something we had planned
to use from the beginning. Similar to Arcade Fire we shot our fight in a
empty car park and just asked the group of people we had brought to have fun
whilst we filmed and the outcome was successful and shows well the theme of
young people having fun. In ‘I Predict a Riot’ there is a shot of the
people walking in holding their pillows. This we realized was very important as
it is similar to an establishing shot and gives the viewer an idea of what is
happening, for this reason we filmed the group walking into the car park
clearly holding the powder in their hands.
We saw that videos such as ‘The
suburbs’ and ‘I predict a riot’ had shots of groups of people enjoying
themselves in ways such as a pillow fight or BB gun fight. Therefore we decided
to include the color powder scene. Color powder is something we had planned
to use from the beginning. Similar to Arcade Fire we shot our fight in a
empty car park and just asked the group of people we had brought to have fun
whilst we filmed and the outcome was successful and shows well the theme of
young people having fun. In ‘I Predict a Riot’ there is a shot of the
people walking in holding their pillows. This we realized was very important as
it is similar to an establishing shot and gives the viewer an idea of what is
happening, for this reason we filmed the group walking into the car park
clearly holding the powder in their hands. 

 Another scene from the Arcade
fire video that we liked was where the boys are riding their bikes through
the street. It again shows the theme of (young life) and s a typical activity
that the younger generation enjoy. This was the exact situation we wanted to
film. Hence we used several shots of bikes and scooters, although we decided to
film in a skate park rather than a street as it looked better and more
interesting when the rider could perform tricks. The shot of a man on a scooter
doing a flip over the ramp is not only extremely effective but also clearly
related to the shot from Arcade Fires video. Personally this is my favorite
shot of our entire video, as it really captures the skater’s enjoyment, I also
believe that it could easily be placed in any professional music video and
would not look out of place. We used natural lighting in the same way as Arcade
Fire did to give a realistic impression of everyday life, in order to get
this impression we dressed the actors in outfits that they would normally wear
when out in a skate park. Another shot we took was of Dom (who is a member of
the group) in a BMX bike hall, once more we filmed him performing tricks in
order to make it more interesting to the viewer.
Another scene from the Arcade
fire video that we liked was where the boys are riding their bikes through
the street. It again shows the theme of (young life) and s a typical activity
that the younger generation enjoy. This was the exact situation we wanted to
film. Hence we used several shots of bikes and scooters, although we decided to
film in a skate park rather than a street as it looked better and more
interesting when the rider could perform tricks. The shot of a man on a scooter
doing a flip over the ramp is not only extremely effective but also clearly
related to the shot from Arcade Fires video. Personally this is my favorite
shot of our entire video, as it really captures the skater’s enjoyment, I also
believe that it could easily be placed in any professional music video and
would not look out of place. We used natural lighting in the same way as Arcade
Fire did to give a realistic impression of everyday life, in order to get
this impression we dressed the actors in outfits that they would normally wear
when out in a skate park. Another shot we took was of Dom (who is a member of
the group) in a BMX bike hall, once more we filmed him performing tricks in
order to make it more interesting to the viewer.


 For the performance aspect the
conventions of music videos showed that it was important to show some long
shots of the entire band, this can be seen throughout the majority of
performance based videos, including Kings of Leon’s ‘Sex on Fire’ and The
Killers ‘Human’ in which you can clearly see the entire band. In our video
we added in some shots of the band with as always the lead singer at the front
and the drummer at the back which is what the conventions of music videos show
us. This is important to most
music videos but to ours it’s even more so, as the band members do not feature
in the narrative which takes up a large amount of the video and therefore could
lead them to becoming a side part instead of the main feature. Though with the
long shot it gives the feel of a live performance. This gives the audience a
feeling of being there and allows them to recognize the band and establish a
difference between that and the story of what happens in the narrative. The
lead singer is always the focal point of a band however the other members also
serve an important role and a few close up shots of them needed to be included,
the shot of the drummer, through the drums is very powerful as it seems as if
you are part of the kit, the smoke machine and positioning of the lights create
a surreal effect. In the
performance most bands seem to have a distinctive look in their videos and in
fact throughout all the media they use, the killers have a smart and
sophisticated style where as kings of Leon are much more rough and ready. With
this in mind we went for a country rock look with the lead singer and guitarist
both sporting checked shirt and denim bottoms, and the keyboard player (myself)
wearing a denim jacket.
For the performance aspect the
conventions of music videos showed that it was important to show some long
shots of the entire band, this can be seen throughout the majority of
performance based videos, including Kings of Leon’s ‘Sex on Fire’ and The
Killers ‘Human’ in which you can clearly see the entire band. In our video
we added in some shots of the band with as always the lead singer at the front
and the drummer at the back which is what the conventions of music videos show
us. This is important to most
music videos but to ours it’s even more so, as the band members do not feature
in the narrative which takes up a large amount of the video and therefore could
lead them to becoming a side part instead of the main feature. Though with the
long shot it gives the feel of a live performance. This gives the audience a
feeling of being there and allows them to recognize the band and establish a
difference between that and the story of what happens in the narrative. The
lead singer is always the focal point of a band however the other members also
serve an important role and a few close up shots of them needed to be included,
the shot of the drummer, through the drums is very powerful as it seems as if
you are part of the kit, the smoke machine and positioning of the lights create
a surreal effect. In the
performance most bands seem to have a distinctive look in their videos and in
fact throughout all the media they use, the killers have a smart and
sophisticated style where as kings of Leon are much more rough and ready. With
this in mind we went for a country rock look with the lead singer and guitarist
both sporting checked shirt and denim bottoms, and the keyboard player (myself)
wearing a denim jacket.

 The lighting was extremely important so we chose to use flood lights, these were very powerful construction
lights for building with halogen bulbs that give off a yellow light which is
perfect for what we wanted. It was our plan to use the
same approach that Huse Monfaradi took when filming the music video to
the Arctic Monkeys 'Brianstrom'. There is a section in our song where
the lead guitarist played by Luke has a singing role and the lighting behind
him creates a great intensity to a part of the song which is slow but has a lot
of meaning “count up all our mistake” this is a line from his vocals which is
quite intense and the lighting behind him almost has a religious quality, like
he is giving an answer to the viewer. It is very similar to the lighting used
in the video for brainstorm as you can see.
The lighting was extremely important so we chose to use flood lights, these were very powerful construction
lights for building with halogen bulbs that give off a yellow light which is
perfect for what we wanted. It was our plan to use the
same approach that Huse Monfaradi took when filming the music video to
the Arctic Monkeys 'Brianstrom'. There is a section in our song where
the lead guitarist played by Luke has a singing role and the lighting behind
him creates a great intensity to a part of the song which is slow but has a lot
of meaning “count up all our mistake” this is a line from his vocals which is
quite intense and the lighting behind him almost has a religious quality, like
he is giving an answer to the viewer. It is very similar to the lighting used
in the video for brainstorm as you can see. One way in which we went against the conventions of music videos
is in the inclusion of steel wool photography. I have never seen this
type of effect used in any music videos before. Steel wool photography is
actually a photo you get from spinning lighted steel wool. Which we were at
first planning on using for the Digipak. However the actual motion of making the picture is
intriguing and we decided to film it and add it to the video. It is important
that it was dark with low lighting due to this allowing the sparks from the
wool to almost look like stars in the sky. We would not have put this in just
because it looked good however it has a meaning, showing a young person
discovering something new.
One way in which we went against the conventions of music videos
is in the inclusion of steel wool photography. I have never seen this
type of effect used in any music videos before. Steel wool photography is
actually a photo you get from spinning lighted steel wool. Which we were at
first planning on using for the Digipak. However the actual motion of making the picture is
intriguing and we decided to film it and add it to the video. It is important
that it was dark with low lighting due to this allowing the sparks from the
wool to almost look like stars in the sky. We would not have put this in just
because it looked good however it has a meaning, showing a young person
discovering something new.
 The most important convention is that of editing with the beat and
tempo of the song. As the video starts we see a man in his car turning on the
radio and as he finds the right station the music comes on which was detailed
editing, again as the main drum beat kicks in we go from a darkened hall with
shadowy figures to a bright light stage with the members of the band clearly
visible. This editing give a real impact to the viewer as when the beat kicks
in the video also comes to life.
The most important convention is that of editing with the beat and
tempo of the song. As the video starts we see a man in his car turning on the
radio and as he finds the right station the music comes on which was detailed
editing, again as the main drum beat kicks in we go from a darkened hall with
shadowy figures to a bright light stage with the members of the band clearly
visible. This editing give a real impact to the viewer as when the beat kicks
in the video also comes to life.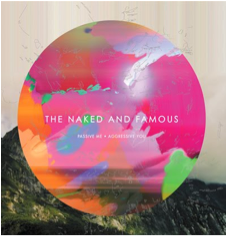
Ancillary Task

 With
the Ancillary tasks we set about our research by looking at other artists
posters and album covers, first we looks at the artist we were using The
Naked and Famous. We noticed that they used the same image for the front
and back of their album along with the poster. Although we realised that it was
very important to have a house style along the media we decided not to use the
same picture instead similar or different photos of the same scene.
With
the Ancillary tasks we set about our research by looking at other artists
posters and album covers, first we looks at the artist we were using The
Naked and Famous. We noticed that they used the same image for the front
and back of their album along with the poster. Although we realised that it was
very important to have a house style along the media we decided not to use the
same picture instead similar or different photos of the same scene.  More
extensive research showed that very few artists use photos of the band members
for their album Digipaks, instead it is often a scene or an object. What we
did find that most used was a band logo, so we found The naked and Famous
logo and used that as the base of our Digipak. At first we believed it necessary to link the Digipak to
the Video its self, however once we realized that the album cover and advert
represented the entire album not just the single our ideas for the them became
far more inventive.
More
extensive research showed that very few artists use photos of the band members
for their album Digipaks, instead it is often a scene or an object. What we
did find that most used was a band logo, so we found The naked and Famous
logo and used that as the base of our Digipak. At first we believed it necessary to link the Digipak to
the Video its self, however once we realized that the album cover and advert
represented the entire album not just the single our ideas for the them became
far more inventive.
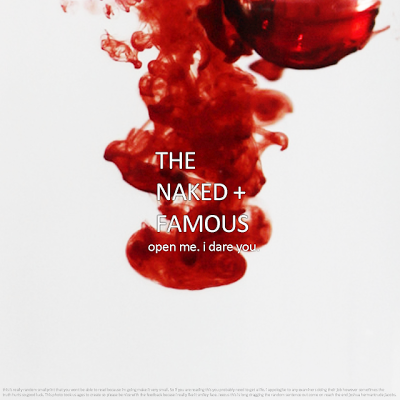
 We tested an idea of using food coloring in
water which when photographed the vibrancy and contrast of the colors gave a
great effect. Henceforth we decided upon using this as a theme for our
ancillary task. You can see the
outcome from this and also the clear house style throughout. The picture itself
although having a very professional look was simple enough to take it was just
the timing that was important.
We tested an idea of using food coloring in
water which when photographed the vibrancy and contrast of the colors gave a
great effect. Henceforth we decided upon using this as a theme for our
ancillary task. You can see the
outcome from this and also the clear house style throughout. The picture itself
although having a very professional look was simple enough to take it was just
the timing that was important. The
magazine advert like many others is the same photo as the album cover; this
creates an immediate link between the two. Our research it magazine adverts such
as The Stone Roses advert which you can see led us to discover it is
important to add where you can purchase the product there for we included the
logo for Play.com and Itunes. We also decided to add in the logo
for Facebook and Twitter as they both would be popular social
networking sites of the age group for our target audience. The final addition
was the incorporation of a release date which is found on all music magazine
adverts.
The
magazine advert like many others is the same photo as the album cover; this
creates an immediate link between the two. Our research it magazine adverts such
as The Stone Roses advert which you can see led us to discover it is
important to add where you can purchase the product there for we included the
logo for Play.com and Itunes. We also decided to add in the logo
for Facebook and Twitter as they both would be popular social
networking sites of the age group for our target audience. The final addition
was the incorporation of a release date which is found on all music magazine
adverts. 


